

Previous: Islamic Book Crafts 2019
30 muslimaat came together to bring you DIY ideas on how to make your Muslim children’s books more interactive. Bring them to life for kids with these crafts. Everyone chose one of their favourite children’s Islamic books and did a craft related to it. If you have a favourite book that we haven’t mentioned here, feel free to submit your craft to editor@ayeina.com 💞 and write down instructions and experience with a brief intro to the book and how your child engaged with it. The submitted image should include the craft and a book on a plain white background.
This is an ongoing series hence we’ll be doing this every year before Ramadan in shaa Allah (it’s important for you to do your thorough research before buying any of these books – although we did go through them (and had to decline a few books based on that), but it’s important to check the authenticity of the material yourself too).
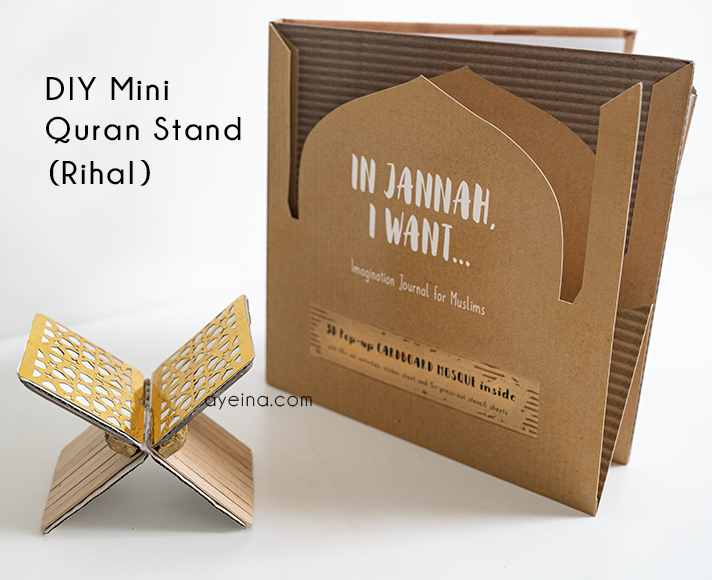
1) In Jannah, I want… (Interactive Imagination Journal)
I (Samina) chose our own book “Jannah journal” (by ayeina.com) – which is designed around 5 senses (sight, sound, smell, taste and touch/feel) to help kids widen their imagination from different perspectives while revolving around the theme of Jannah. Since the base of human creativity is colours and shapes, the whole journal revolves around them (also to avoid illustrations of Jannah which may inhibit kids’ imagination as we can never do justice to what Jannah will be like). Each of the 5 senses is followed by a journaling section that focuses on that specific sense with a small Jannah dua to memorise.
Materials needed for the DIY mini Quran Stand (Rihal): cardboard, popsicle sticks, glue gun, decoration stencil/stickers, craft knife/cutter, scissor, tape, hard foam boards (for stand support).
What to do: Cut two slabs of cardboard in equal sizes. Make cuts in the middle of both cardboard pieces so they can intertwine with each other, while leaving a half of the space so it doesn’t cut all the way through. Either layer your cardboard with more cardboard or glue popsicle sticks to make the base strong so a mini travel Quran can actually be read on it. My kids are making their dolls Muslim too by making them read the Quran all day err day. Decorate the stand as you wish. I personally used a stencil from Jannah Journal (3D lift-a-flap book – not yet released). An important point to note is that cardboard is not too strong to hold a lot of weight, so I added hard foam board blocks at the bottom to give the upper stand a strong support to hold an actual travel Quran (we have two of those and now the kids are fighting who gets to keep the stand). I think I’ll have to make another one and this time, I may try a traditional Quran stand that is intertwined more strongly in shaa Allah.
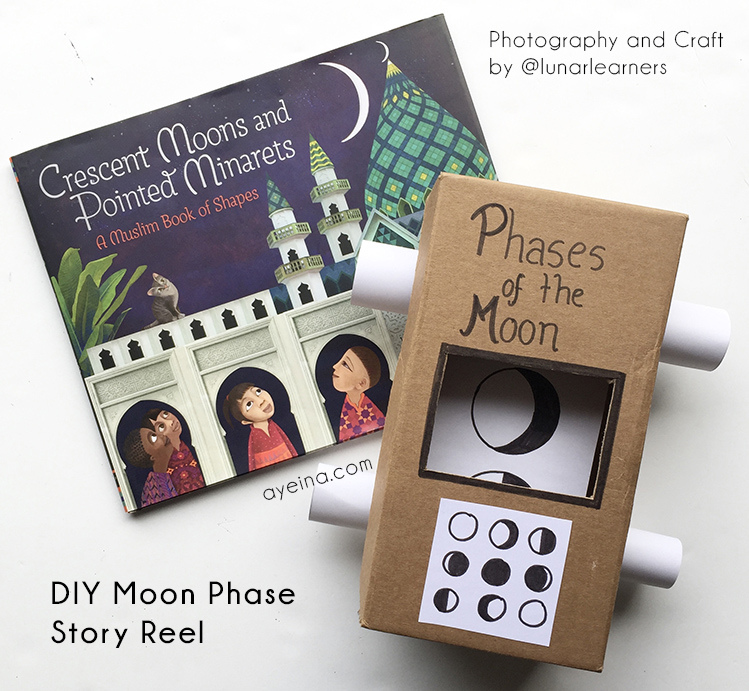
2) Crescent Moons and Pointed Minarets (Picture Book):
Khadija from lunarlearners.com chose the book “Crescent Moons and Pointed Minarets” by Hena Khan – “which is a beautifully illustrated book that wonderfully captures shapes and traditions throughout the Muslim world.”
Materials needed for the DIY moon phase story reel: Shoe box/small box, 2 x kitchen rolls/rolled up card stock, strip of plain paper, elastic bands, tape, x-acto knife, markers.
What to do: Using the kitchen roll as a template, draw 4 circles on the sides of the box (2 on either side). Using an x-acto knife, cut out the circles. This should allow the two kitchen rolls to slide through the box. Put two elastic bands on the top kitchen roll before sliding through. This will provide some grip for the paper enabling it to rotate. Cut a plain strip of paper that is a little narrower than the box and long enough to wrap all the way around the rolls. Draw the moon phases on the strip of paper. Attach your picture strip around the two rolls and tape together. Finally cut a window in the top of the box. Now roll away! You can see this VIDEO for detailed instructions.
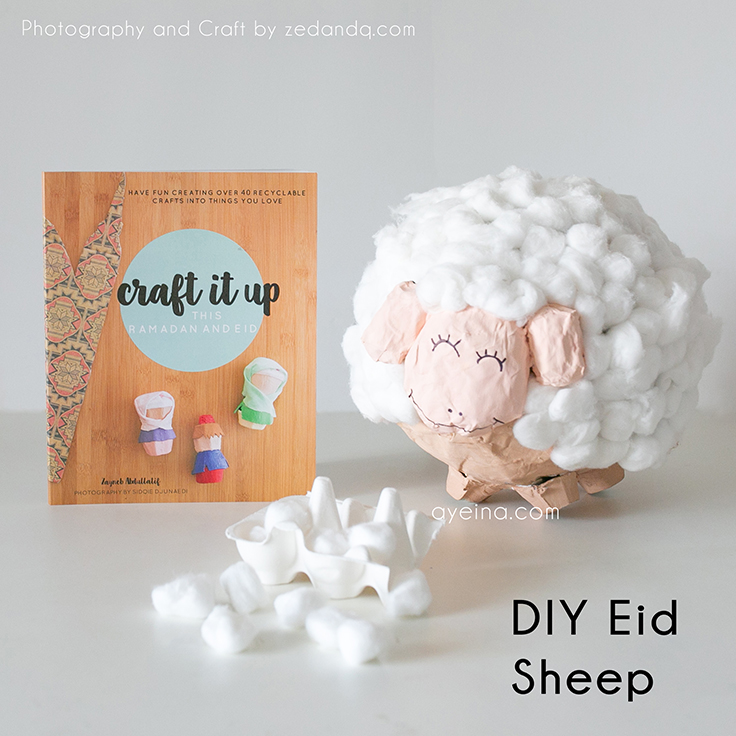
3) Craft it up (Craft Book for Ramadan & Eid)
zedandq.com chose her own book “Craft it up” – which is “the world’s first Muslim Craft Book dedicated to help your child’s creativity flourish! Craft it Up encourages creativity with your child based on Islamic values, in a non-directive approach. Spend valuable time together while crafting using materials found in your own home!”
Materials needed for the DIY Eid sheep: Newspaper, glue, balloon, egg holders, cotton balls and paint.
What to do: Tear newspaper into strips and apply with glue onto the blown up balloon. Repeat until you’ve built up 4-6 layers all over. Leave to dry. Dip sheets of newspaper into glue and form the shapes of ears, a face and a tail. Leave to dry. Cut 4 egg holders to use as feet and glue them on the sheep along with the ears, face and tail. Apply glue all over top half and stick the cotton balls on. Paint the face, ears, feet and the rest of the body. You can even turn it into a pinata like shown in THIS VIDEO.
4) The Bismillah Book (Multimedia Board Book)
Mehnaz from bismillahbuddies.com chose her own book “The Bismillah Book” – which you can “Read and Sing Along with the friendly whale (We’ve named him Bluey in our house) as he teaches us to say Bismillah before we take a bite of our favorite foods. We love to change the words of the rhyme and replace it with what’s on the menu that day”.
Materials needed for the DIY colour-changing frame: Plain Greeting Card or A5 Card stock, white paper, clear plastic folder, colors, scissors and tape.
What to do: Cut out a rectangle from the center of one of the sides of the greeting card to make a frame. Tape the bottom and one side of the greeting card to create an envelope of sorts. Cut the clear plastic folder and 2 sheets of plain white paper to fit inside your envelope. Draw your whale image on one white paper and color it in. Place the clear sheet on top of this image and trace the outline with a marker. Take the piece of rectangle that was cut out from the greeting card and cut it into a triangle shape . Tape the colored image below the triangle and the outline sketch above the triangle to create a pull out tab. Place the other plain sheet between the colored image and the outline so that only the outline image is now visible. Place all sheets With the pull out tab into the frame envelope. Pull the tab to reveal the colored image inside. You can see THIS VIDEO to get a better idea.

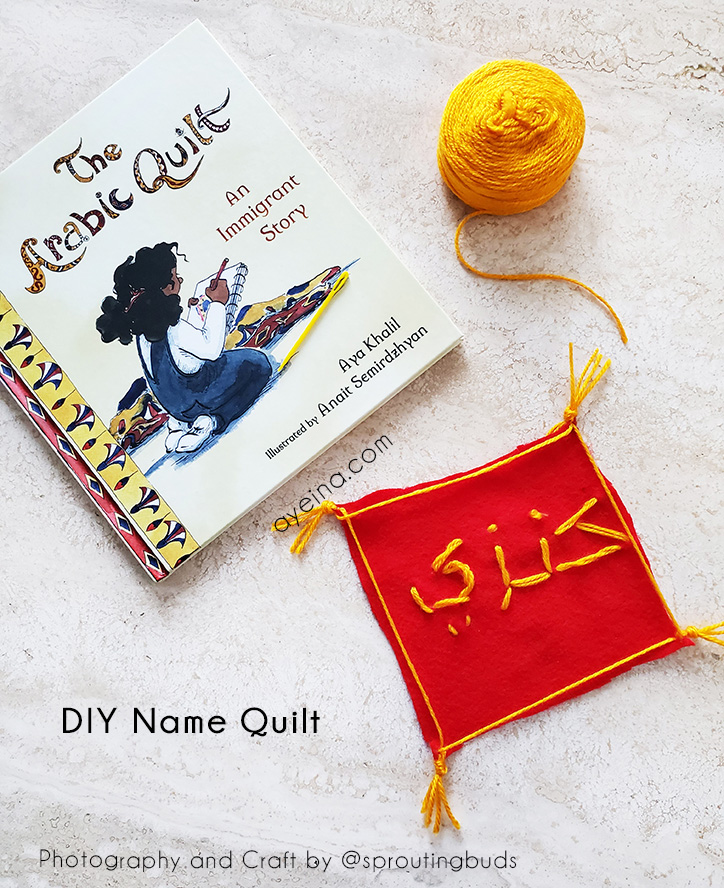
5) The Arabic Quilt (Story Book)
@sproutingbuds chose the book “The Arabic Quilt” by Aya Khalil – which is about “Kanzi’s family – who has moved from Egypt to America, and on her first day in a new school, what she wants more than anything is to fit in. Maybe that’s why she forgets to take the kofta sandwich her mother has made for her lunch, but that backfires when Mama shows up at school with the sandwich. Mama wears a hijab and calls her daughter Habibti (dear one). When she leaves, the teasing starts. That night, Kanzi wraps herself in the beautiful Arabic quilt her teita (grandma) in Cairo gave her and writes a poem in Arabic about the quilt. Next day her teacher sees the poem and gets the entire class excited about creating a “quilt” of student names in Arabic. In the end, Kanzi’s most treasured reminder of her old home provides a pathway for acceptance in her new one”.
Materials needed for the DIY name quilt: Yarn, Needle, Felt (or any piece of cloth).
What to do: Start with printing (or writing) your child’s name on a plain sheet of paper. Have them thread the needle with some yarn (with some help). Simply use the name as a guide to sew their name. Finally make a basic border with yarn and add a tassle. Your tassle can be easily made by cutting 4 pieces of yarn and knotting them together! For multiple kids, add the quilts together to make a grand quilt!
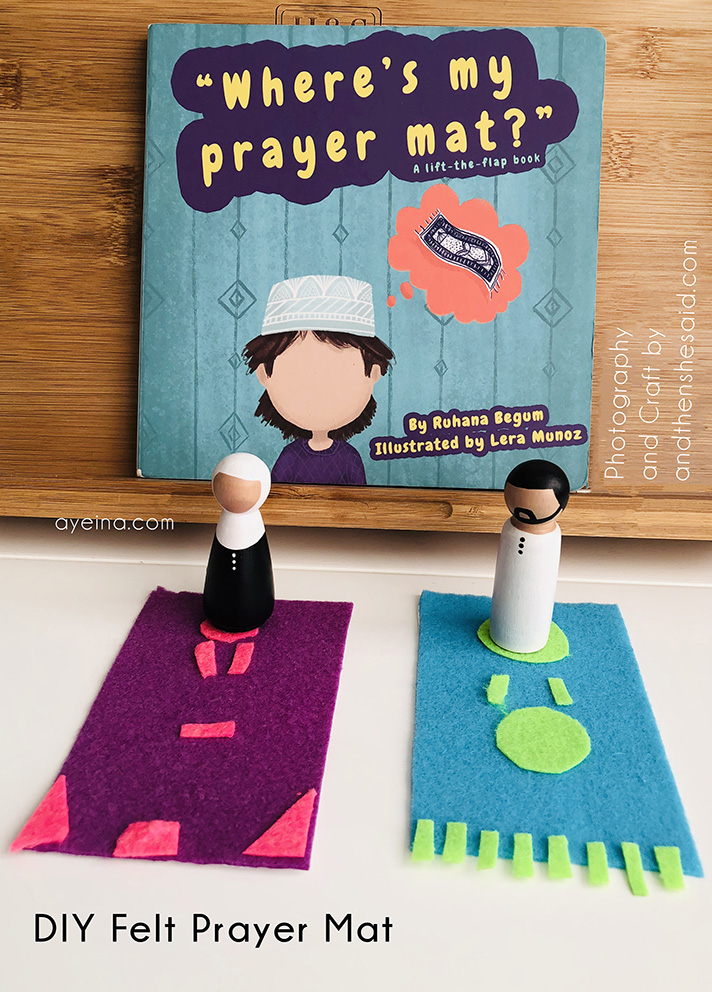
6) Where’s My Prayer Mat? (Interactive Board Book)
Iman from andthenshesaid.com chose the book “Where’s My Prayer Mat?” by Ruhana Begum – “which is about Musa and his search for his prayer mat. After making wudhu, Musa can’t seem to find his prayer mat so he looks all over the house for it and children can lift the flaps to see him finding his prayer hat, Qur’an, du’a book, and tasbeeh before he finds his mat! My children love the book and it has introduced my 4 year old to some Islamic key words and she’s constantly working on her reading using this book as it’s simple and easy to follow. We decided to create Musa’s prayer mat for their peg dolls to pray on!”
Materials needed for the DIY prayer mat: Sheets of felt (we’ve used sticky back felt here to make it even easier), a prayer mat template (we’ve used this one by Karima’s Crafts), a pair of scissors and some peg dolls (these are optional).
What to do: Have your children pick the colours they want for their mats. Mine picked a colour for the base and then another for the ‘decorations’ on the mat. Trace the template out on the felt and have them cut them out. If you’re using sticky back felt, leave the protective sheet on for the base. Have them draw their designs on the other sheet of felt, cut out the shapes and simply peel back the protective sheet and stick them on!
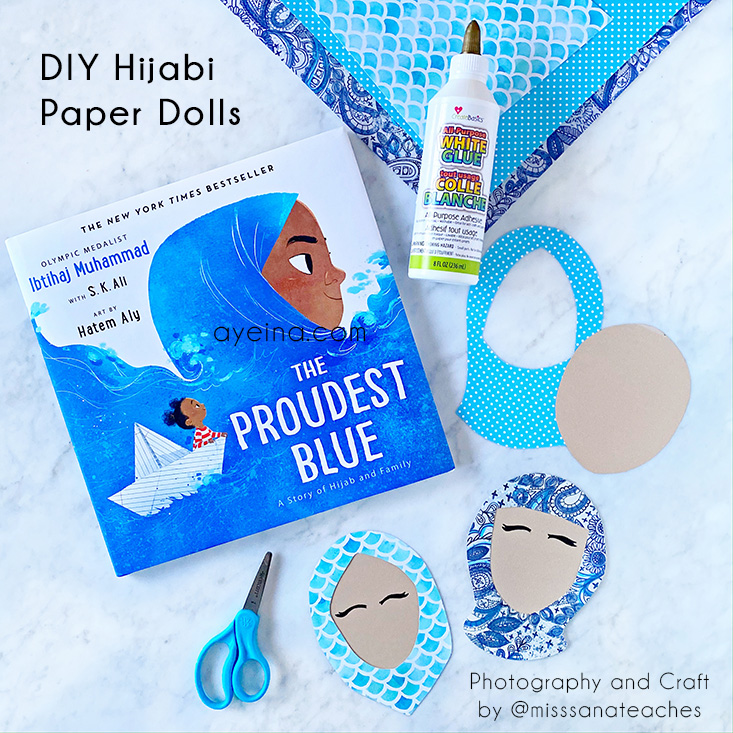
7) The Proudest Blue (Story Book)
Sana from @misssanateaches chose the book “The Proudest Blue” by Ibtihaj Muhammad and S.K. Ali – “which is a story about Hijab and family. It follows two sisters, Faizah and Asiya on their first day of school. Asiya, a 6th grader, is wearing her hijab for the first time and has chosen a beautiful blue hijab as her “first day” hijab. Faizah proudly watches her sister wear her hijab throughout the day even as bullies taunt her. This book beautifully sends a powerful message to be proud of who you are, to stay strong and hold on to your faith”.
Materials needed for DIY Hijabi Paper Dolls: Scrapbooking paper in different patterns (shades of blue), skin-coloured cardstock, glue, scissors, fine tip, black marker.
What to do: Cut oval shapes out of any skin-coloured cardstock to create the face shape. Cut out different hijab styles in different patterns using scrapbook paper. Glue the hijab onto the face. Draw on any facial features that you desire.
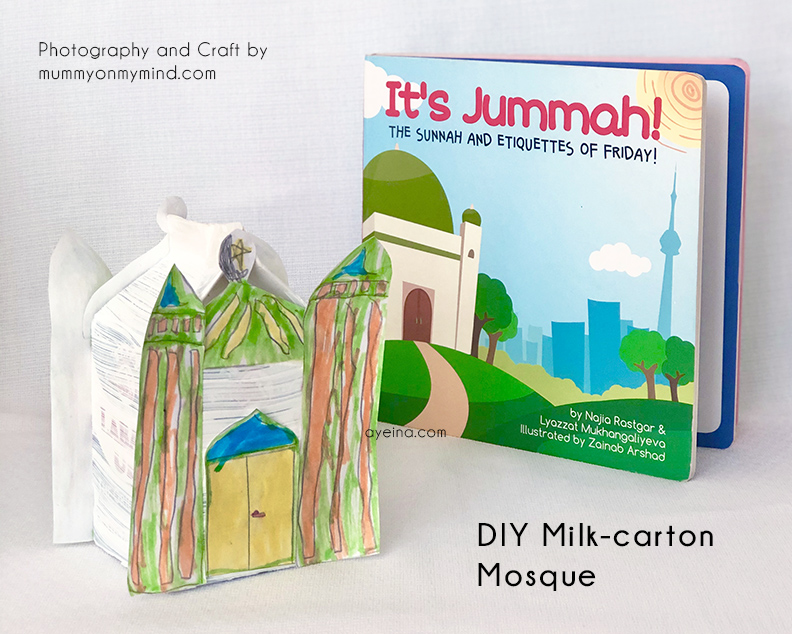
8) It’s Jummah (Board Book)
Zeyna from mummyonmymind.com chose the book “It’s Jummah” – “which is a lovely little board book to introduce the Sunnahs and Etiquettes of Friday to little ones. We love reading this book and checking off how many of the sunnahs we complete every Friday before my elder son goes to pray Jummah namaz with his father”.
Materials needed for the DIY laban-box/milk carton mosque: Empty laban box (or milk carton), acrylic paint, glue, scissor, paper and markers.
What to do: For the book related craft, we used an empty box of Laban, our staple drink during Ramadan Iftars, and put it to good use to transform it into our own little mini Masjid. My son painted the whole drink box using white acrylic paint, and he then drew two minarets for either side, a dome and the door for the Masjid. He coloured it in and then we stuck it on the Laban box together to create the Masjid! You can do it for both sides like we did too, and even add little windows, or mini figures around it to symbolise Muslims answering the call to prayer.
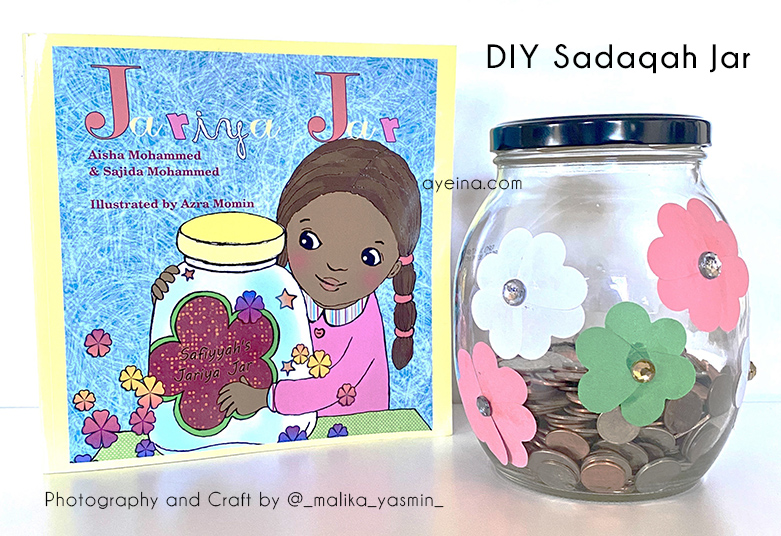
9) Jariya Jar (Story Book)
@_malika_yasmin_ chose the book “Jariya Jar” by Aisha Mohammed and Sajidah Mohammed – which is about “the concept of charity in Islam. The story of Safiyyah and her Jariyah Jar helps to introduce this concept to young children in a fun way”.
Materials needed for the DIY sadaqah jar: Jar + any form of decorative materials (paper, ribbon, jewels, pom poms, stickers, etc.).
What to do: After decorating the jar, allow kids to begin filling jar with their own money, loose change, or do a Q&A about the book in exchange of coins for jars. Store the jar someplace visible to keep interest.
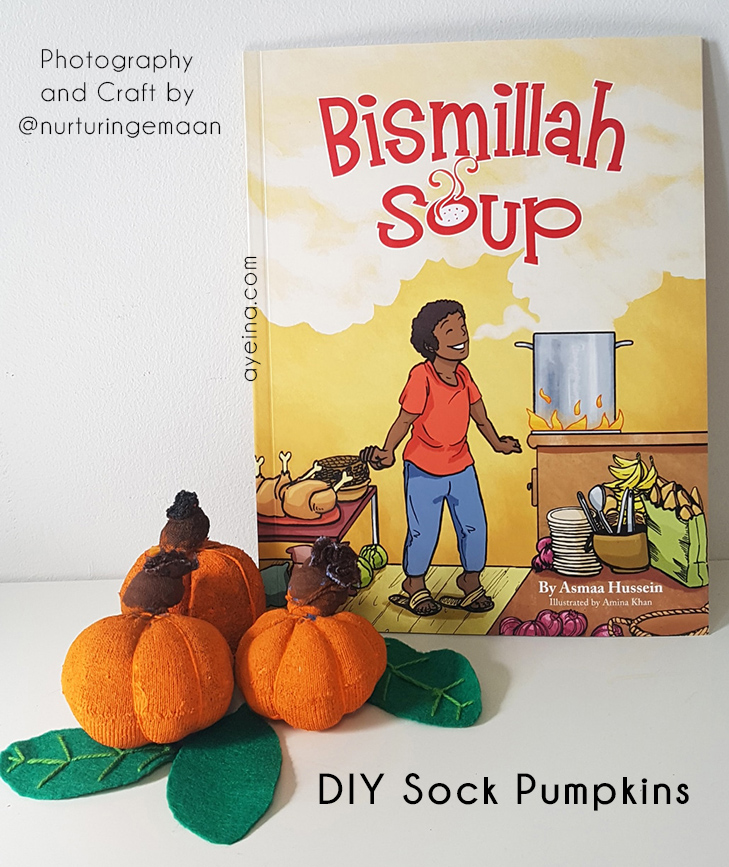
10) Bismillah Soup (Story Book)
@nurturingemaan chose the book “Bismillah Soup” by Asmaa Hussein – “which is a story about a boy named Hasan who sets out to make a delicious feast for his mother. He realizes that he doesn’t have enough food to prepare the feast, but the sheikh at the masjid advises him to start with Bismillah. He discovers how saying Bismillah before a task can make it easier. With the help of his friends and neighbors and the power of Bismillah, Hasan then prepares a spectacular feast at the masjid”.
Materials needed for the DIY sock pumpkins: old sock, yarn, stuffing (cotton balls etc.), orange and brown paint and a paint brush.
What to do: Start by adding the stuffing into the sock and push it all the way to the end. Hold the end of the sock and tie a knot. Wrap the yarn around the knot, then around the pumpkin to form the wedges, again around the knot and secure with a double knot. Cut off the excess sock and yarn. Paint the pumpkin orange and the knot brown. Once the paint has dried the pumpkins are ready. You can see THIS VIDEO for help.
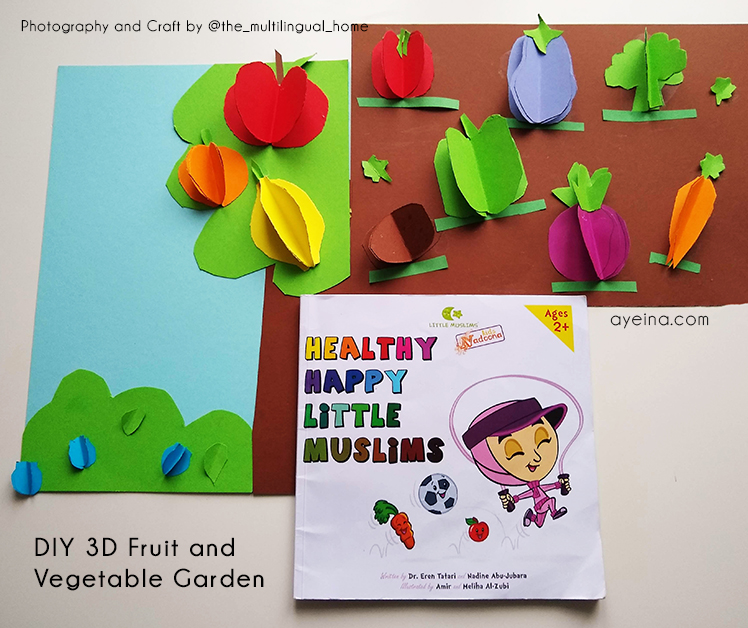
11) Healthy, Happy Little Muslims (Educational Story Book)
@the_multilingual_home chose the book “Healthy, Happy Little Muslims” by Dr. Eren Tatari and Nadine Abu-Jubara – which is about “teaching kids that eating healthy and keeping active is important. It tells the story of Nadoona and her big soccer match. She shares how she gets ready for the game by keeping herself happy and healthy. My kids liked the vibrant illustrations and they said they could relate to Nadoona’s story. There are fun activity pages at the end of the book where kids can color in a rainbow of healthy food and sports. Also, there is a recipe for smoothies too and we made some while working on this 3-D fruit and vegetable garden activity below”.
Materials needed for DIY 3D Fruit and Vegetable Garden: Variety of colored construction paper, Fruit and Vegetable cut-outs, Glue, scissors, pencil.
What to do: Decide what kinds of fruits and vegetables you would like to make and how you will arrange them on the page. Find fruits and vegetables cut-outs to act as templates. You will need three pieces of paper per fruit and vegetable that you make. Use a pencil to trace the object on one piece of paper. Put all three pieces of paper together and cut them out, it is easier to match up and fold if you cut all pieces of the one object together. Fold the object in the middle. Separate the three pieces. Take one folded piece and put glue on one half. Then take a second piece and put it on top of the first. It is important to make sure the pieces match up so that the object looks 3 dimensional. Do the same for the third piece. Now you should be able to see the 3-D shape. Paste your 3-D shaped fruit or vegetable on paper. Be creative and make your own vegetable garden or fruit tree. Continue making fruits and vegetables till your garden and trees are full.
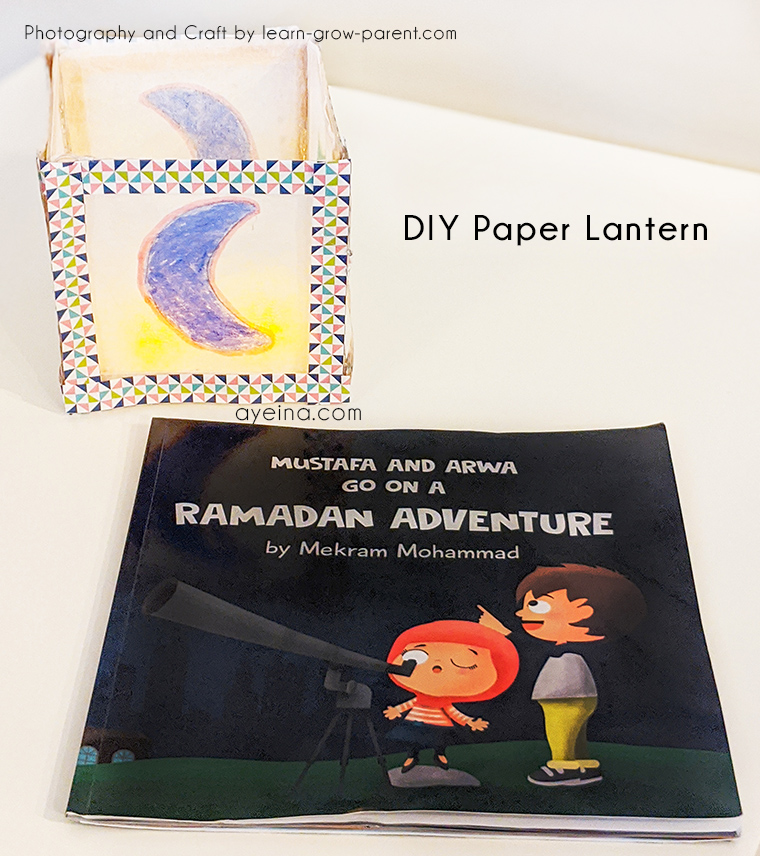
12) Mustafa and Arwa Go On a Ramadan Adventure (Story Book)
Khadiga from learn-grow-parent.com chose the book “Mustafa and Arwa Go On a Ramadan Adventure” by Mekram Mohammad – which is a story of “Mustafa and Arwa who venture through the month of Ramadan. They learn about the joys of participating in Suhoor, fasting throughout the day, breaking their fast with delicious foods, and giving charity. They even venture all the way to Eid Al Fitr. The author uses rhyming to describe the fun that Mustafa and Arwa are having throughout this blessed month”.
Materials needed for DIY paper lantern: Craft sticks, regular glue, hot glue, markers, tracing paper (or parchment paper), washi tape, LED tealight candles (2 or more for the lighting effect), crescent and star shapes for tracing (optional if you can draw this by hand).
What to do: Build the sides and bottom of the lantern with popsicle sticks using hot glue. You’ll take 4 popsicle sticks and make a square to do this, attaching the ends of the sticks to one another. Next, measure and cut out 4 pieces of parchment paper to fit the square sides. After you cut them to fit the sides, trace or hand draw the crescent and star, coloring and designing the sides. Finally, glue the parchment paper to the backs of the squares and then hot glue the sides to each other, gluing the bottom at the end to secure all sides. Use the washi tape to decorate the edges of the lantern (where the popsicle sticks show). The tealights are to be set inside to light up the lantern. This craft was inspired by the original craft-maker The Joy Sharing.
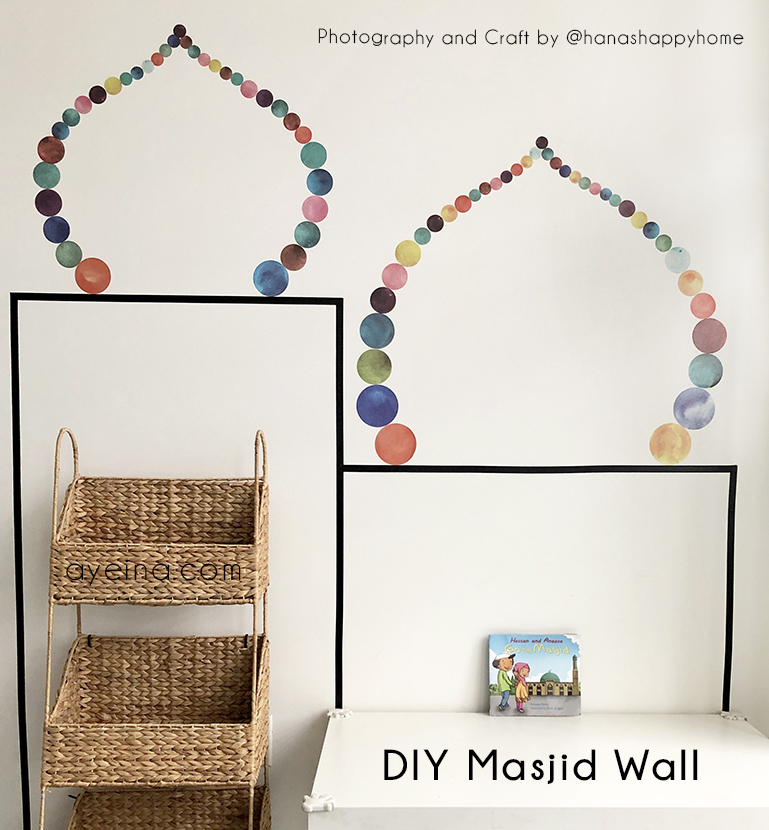
13) Hassan and Aneesa Go To Masjid (Story Book)
Hana from hanashappy.home.blog chose the book “Hassan and Aneesa Go To Masjid” by Yasmeen Rahim and Omar Burgess – “which is a favourite in our home. After reading this book, my son Mikaeel would constantly ask us when we were going to the masjid. I love that this book instilled a special place in his heart for the masjid. So I thought about how we could foster that environment at home. The wash tape masjid is a physical reminder of the masjid. We have it as a permanent part of our kids play area”.
Materials needed for the DIY Masjid Wall: black wash tape – circle decals (these were purchased from Wayfair)- pencil, ruler, level, tape measurer, scrap newspaper.
What to do: Sketch out the rectangles that will make your masjid. Be sure to use the level. Then, tape it with the washi tape. Sketch out a half dome on the newspaper (like you would for a half heart). Cut it out and trace the second half. Tape the two pieces together to make your dome template. Trace the dome templates on the wall. Stick the circle decals to make the domes. For step by step video, check out @hanashappyhome.
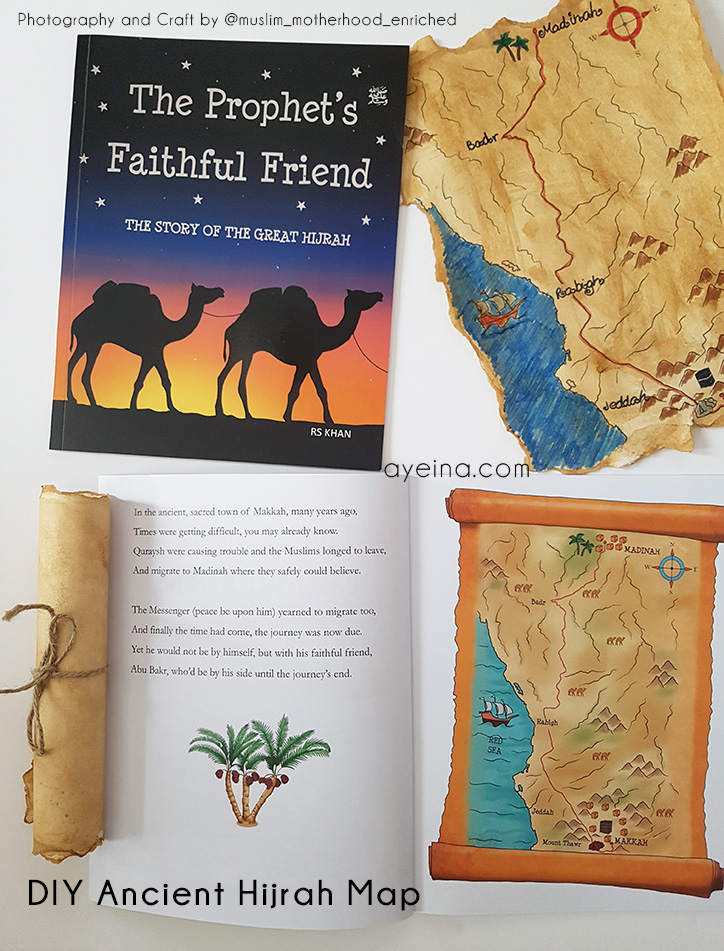
14) The Prophet’s ﷺ Faithful Friend (Story Book)
@muslim_motherhood_enriched chose her own book “The Prophet’s ﷺ Faithful Friend” – “which is the 3rd in a series of rhyming storybooks about the Seerah. It follows the beloved Prophet ﷺ and his closest Companion, Abu Bakr as-Siddeeq (may Allah be pleased with him) on the momentous hijrah journey from Makkah to Madinah, a journey of patience, true friendship, sacrifice and reliance upon Allah”.
Materials needed for the DIY ancient Hijrah map: A4 white card, 1/4 cup of black coffee, Paintbrush, Scissors, Glue stick, Felt tip pens.
What to do: Print the map outline onto A4 card here. Rip about 1/2 inch off each side of the card to create a jagged edge. Write the place names in the correct places on the map (using the example map in the pdf) or cut and glue the labels provided. Brush black coffee onto both sides of the card, using a hair dryer to dry in between. Colour the map in or decorate with extras such as sand, 3d palm trees, etc. Roll the map up and tie it with ribbon.
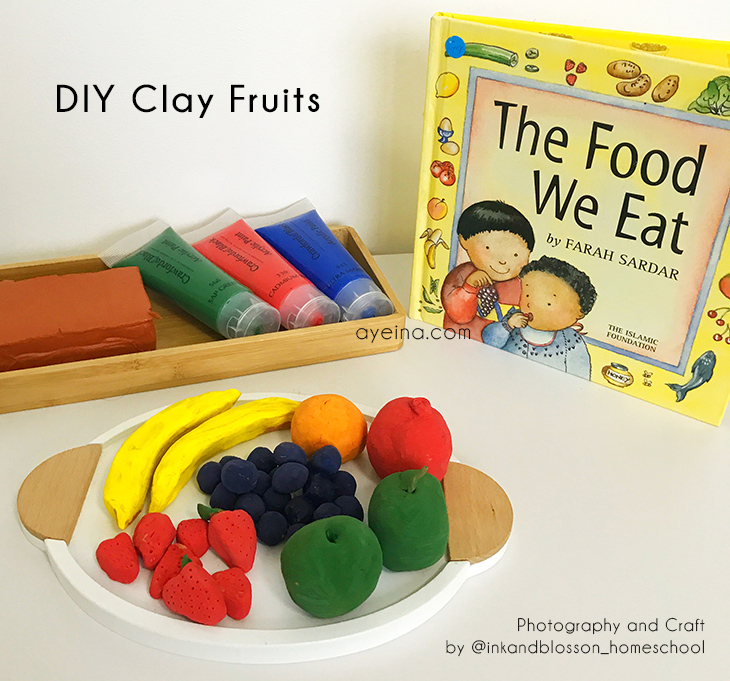
15) The Food We Eat (Educational Story Book)
Raeesa from @inkandblossom_homeschool chose the book “The Food We Eat” by by Farah Sardar – which “takes us on a journey of looking at lots of beautiful food and drinks all the while reminding us that Allah gave us these blessings. The pictures are colourful and attractive and my son has loved reading this book with us from a very early age. It can also be used for lots of discussion with little ones; colours of fruits, hot and cold foods, sweet and sour tastes – we always end up talking about these type of things when we open this book Alhamdulilah! We talked about what our favourite foods mentioned in the book are. After picking a few each we then spoke about the different shapes and colours of the fruits and whether we could make them with clay. My son was very excited to try this out and loved the idea of painting them!
Materials needed for the DIY clay fruits: Quick drying clay, Acrylic paints, Paintbrush, Jars or pots for paints, serving tray (optional).
What to do: We used the clay to make bananas, strawberries, oranges, grapes, apples and a pomegranate. Most of these were done completely independently by my almost three year old as they are just ball shaped, but I had to help him with the banana and supervise him pricking the strawberries with a toothpick to make little holes! Once the clay is shaped let all the fruits dry on a tray for approx 24 hours and then they are ready to paint. For the smaller ones like grapes I filled little pots with the colour needed, my son then dipped them in and placed them on a try to dry. He loved this method as it was messy and felt funny so I would recommend trying it out with some smaller shaped fruits! The fruits need almost 24 hours to dry properly but once they are they make a very colourful fun display masha’Allah!
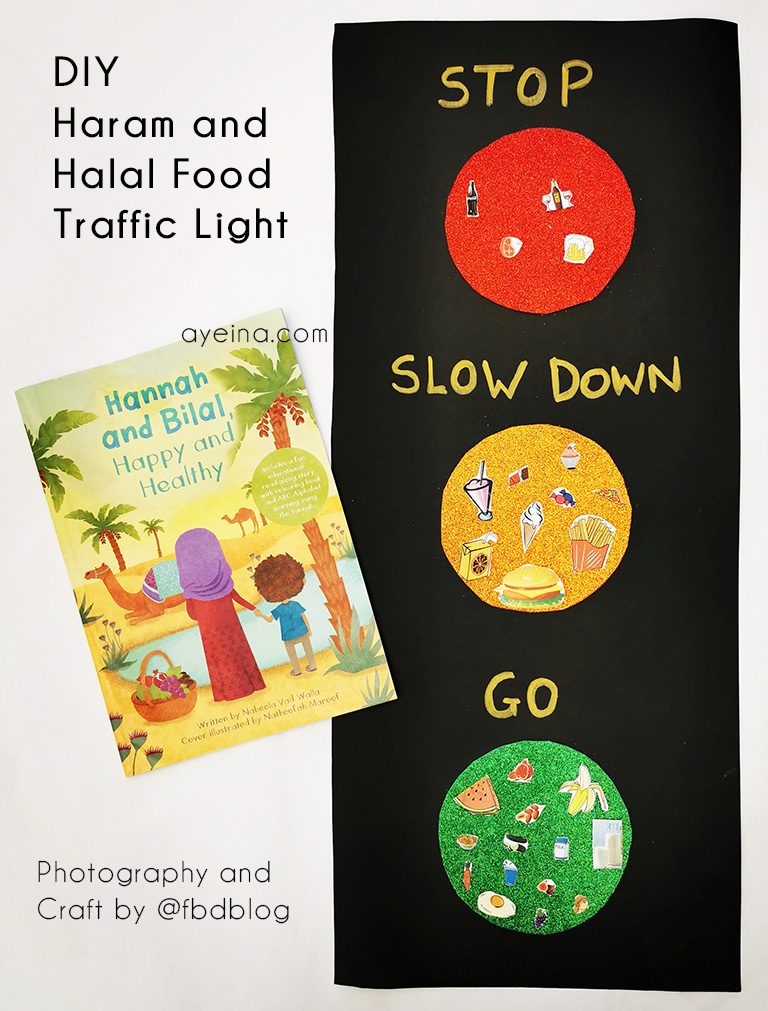
16) Hannah and Bilal, Happy and Healthy (Educational Story Book)
Fatima from @fbdblog chose the book “Hannah and Bilal, Happy and Healthy” by Nabeela Vad Walla – “which is a story about a brother and sister who go on a journey to learn about the sunnah foods that were eaten by the Prophet ﷺ. The accompanying craft is inspired by Dr Sears and aims to help children learn about which foods are good for their bodies.”
Materials needed for the DIY Haram and Halal food traffic light: Materials needed for the food traffic light craft: black piece of paper, red, orange and green glitter foam/paper, a circle shape to trace, scissors, glue, and pictures (printed or hand drawn) of a variety of healthy and unhealthy foods, including haraam foods and sunnah foods.
What to do: Use your circle shape to trace out a red circle, an orange circle and a green circle then cut these out and glue them on the black paper to resemble a traffic light. Cut out the pictures of food and sort them into foods that are good for the body (green light foods), foods which aren’t great for the body but may be consumed on occasion (orange light food) and foods which are prohibited because they are haraam or because your family deems them unhealthy and never to be consumed (red light foods). Be sure to have a discussion on how green light foods and sunnah foods help your body but orange and red light foods harms your body.
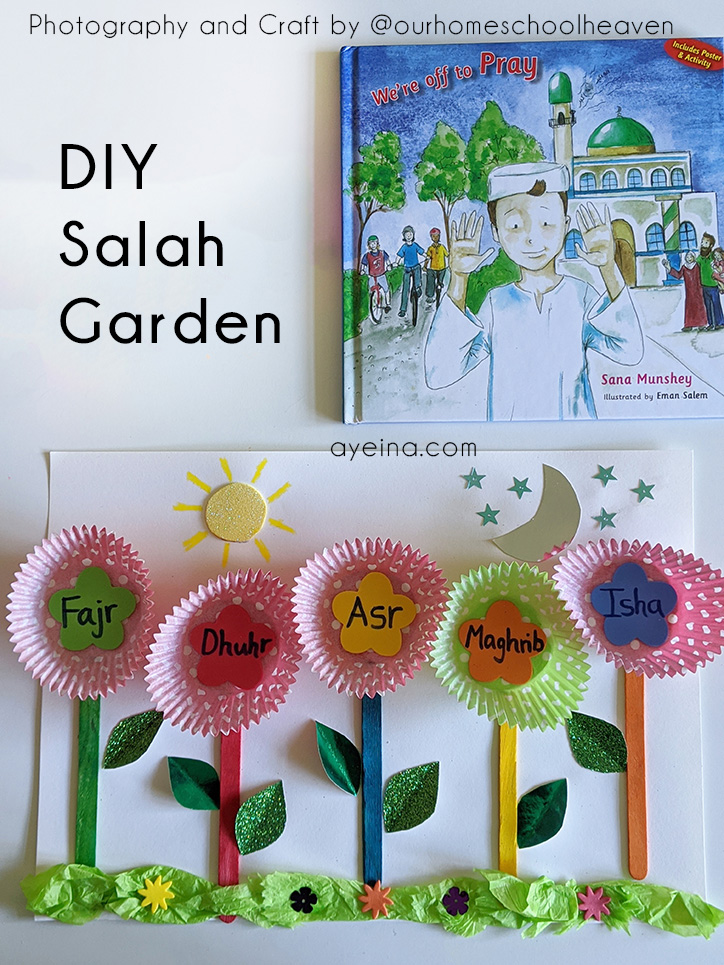
17) We’re off to pray (Story Book)
@ourhomeschoolheaven chose the book “We’re off to pray” by Sana Munshey – “which is a lovely rhyming story about the importance of prayer. We made a 5 salah flowers craft as a way to remember that our day starts and finishes with prayer, and how prayer grows our faith!”
Materials needed for the DIY salah garden: Cupcake liners, popsicle sticks, tissue paper, glue, pen/pencils, cardstock, foam sheet, scissors.
What to do: Use 5 cupcake cases and craft sticks to build five flowers, write the salah names inside. Cut out leaves using green card and glue green tissue paper for grass. Draw or stick a sun on the left side for the daytime prayers and a moon on the right side, above Maghrib and Isha. Stick it up where you can see it everyday or in a special prayer area in your house.
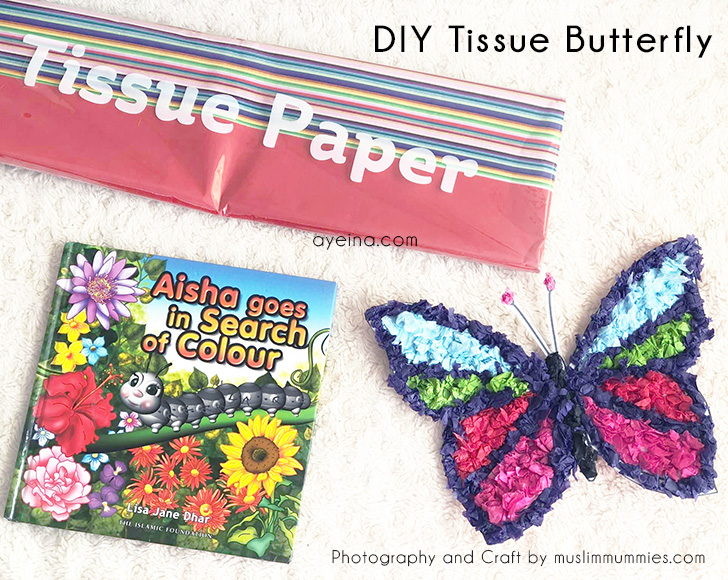
18) Aisha goes in search of colour (Story Book)
Fozia from muslimmummies.com chose the book “Aisha goes in search of colour” by Lisa Jane Dhar – “which is a story of a caterpillar, Aisha, who lives in a land of colour, but she is born plain grey. She deals with being different and goes in her search for some colour.”
Materials needed for the DIY tissue butterfly: Outline of butterfly on paper, Cardboard (for strong backing), Tissue paper, Glue.
What to do: Print out a template of a butterfly and glue it on some cardboard to strengthen it. Or draw your own butterfly shape. Scrunch up small pieces of tissue paper and glue them all on the paper. Make the butterfly as colourful as you can. You can even add gems if you want!
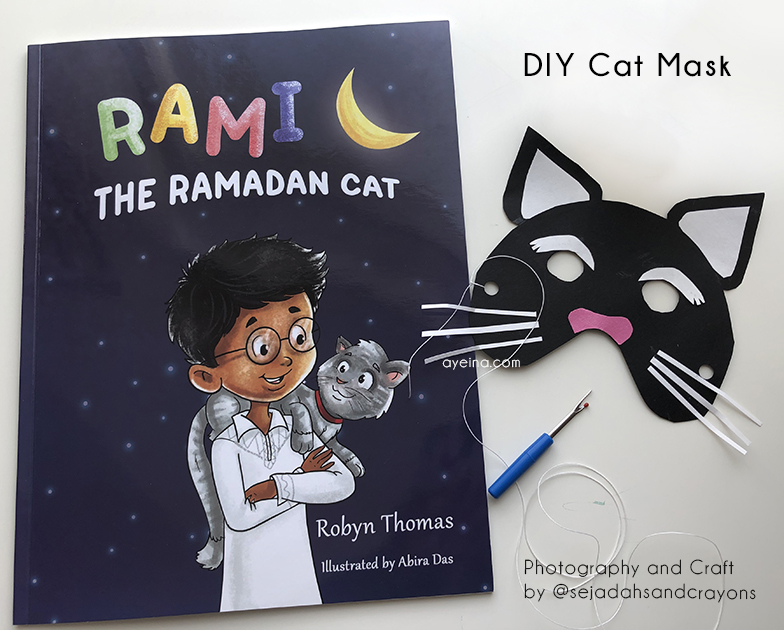
19) Rami, the Ramadan cat (Story Book)
Tugba from @sejadahsandcrayons chose the book “Rami the Ramadan Cat” by Robyn Thomas – “which is a story that ends with a clever twist! On the very first night of Ramadan, Saleem finds a lost kitten in his new backyard. He attempts to find the owner by putting up posters. In his heart, he longs to keep Rami as his own pet because he is new to the neighborhood with no other friends. Saleem is tear-eyed when they eventually locate the owner and Rami goes home, but Eid becomes much more cheerful when they meet again.”
Materials needed for the DIY cat mask: scissors, card stock (or construction) paper, elastic band, exacto knife or seam ripper, scissors.
What to do: Prepare cat mask templates (face, ears, nose, whiskers) for the children to cut out, make sure it matches the size of your child’s face. If the child is too young to use scissors, prepare the cut-outs in advance. Make holes for the eyes by using an exacto knife or a seam ripper depending on the paper you are using. Punch one hole on each side of the side cheek to put the elastic band through at the end. Allow the child to glue the pieces on to the main template. Put the elastic band through the punched holes and size it to the child’s head size. Enjoy the day with your little cat.
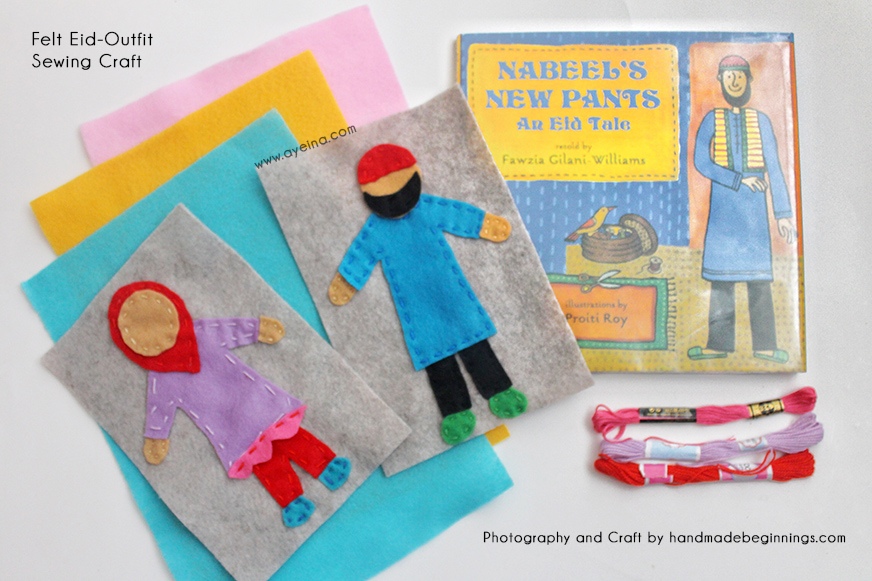
20) Nabeel’s New Pants – An Eid Tale (Story Book)
handmadebeginnings.com chose the book “Nabeel’s New Pants – An Eid Tale”, by Fawzia Gilani-Williams, which is a story about a man who decides to buy presents for his family for Eid. He also buys himself a pair of pants, but when he asks his wife, mother, and daughter to hem the pants for him, they are all too busy. In the end, he hems the pants on his own, but when he puts them on, on Eid day, he is in for a surprise! Eva says: “My children had fun practicing their sewing skills and designing their dream Eid outfits with felt! They loved the story and thought the end was hilarious”.
Materials needed for the felt sewing craft: Assortment of coloured felt, embroidery thread, embroidery thread needle, and scissor.
What to do: Cut clothing shapes from felt. Thread your embroidery needle with embroidery thread. Tie a knot at the end of your thread. Sew on your pieces to a larger background piece of felt using a running stitch. Make sure to start at the back of your project to hide the knot! You can also mix and match felt colours, embellishments, and styles to design Eid outfits while also practicing a basic running stitch with your child.
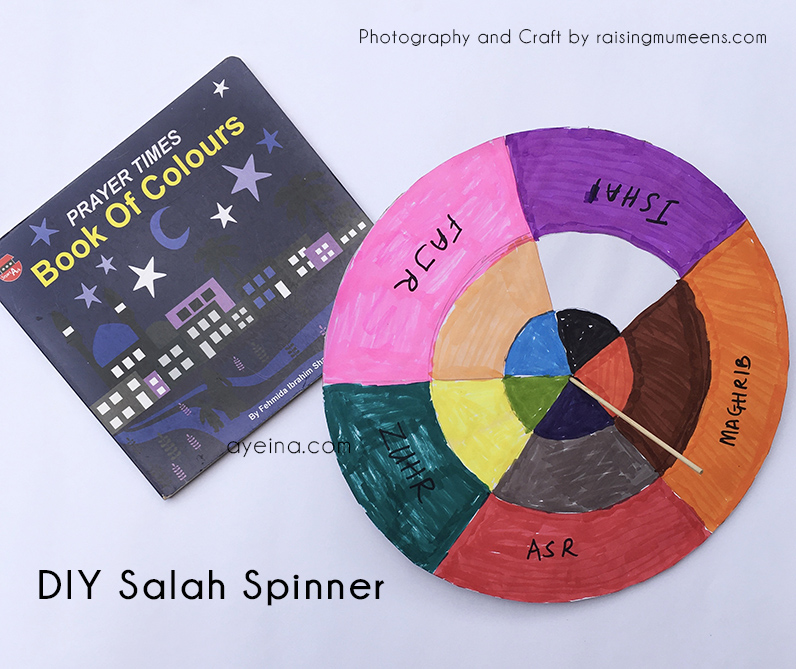
21) Prayer Times – Book of Colours (Board Book)
Amina from raisingmumeens.com chose the book “Prayer Times Book of Colours” by Smart Ark – which is a board book with 12 pages that introduces your child to colours and also introduces them to the five daily prayer in a delightful way.
Materials needed for the DIY salah spinner: Card-stock, Corrugated paper, Scissors, Glue, Markers, Jute rope or kebab sticks, Pencil.
What to do: Cut a cardboard and corrugated paper in the shape of a circle. The corrugated paper is to reinforce the cardstock paper so that it does not tear easily and last longer. Glue the white cardstock paper onto the corrugated paper. Using a pencil, divide the white circular cardstock into 5, like cutting a pie (but draw, don’t cut). Divide each portion into 3 (We used three different sizes of bowls to draw the bigger circle and the two circles as pictured). Colour each divided portion with the colour of the salah as in the book. Write the name of each salah. Put a hole at the center. Pass a jute rope or kebab stick through the hole and spin away! Watch as the colours spin into a beautiful blend.
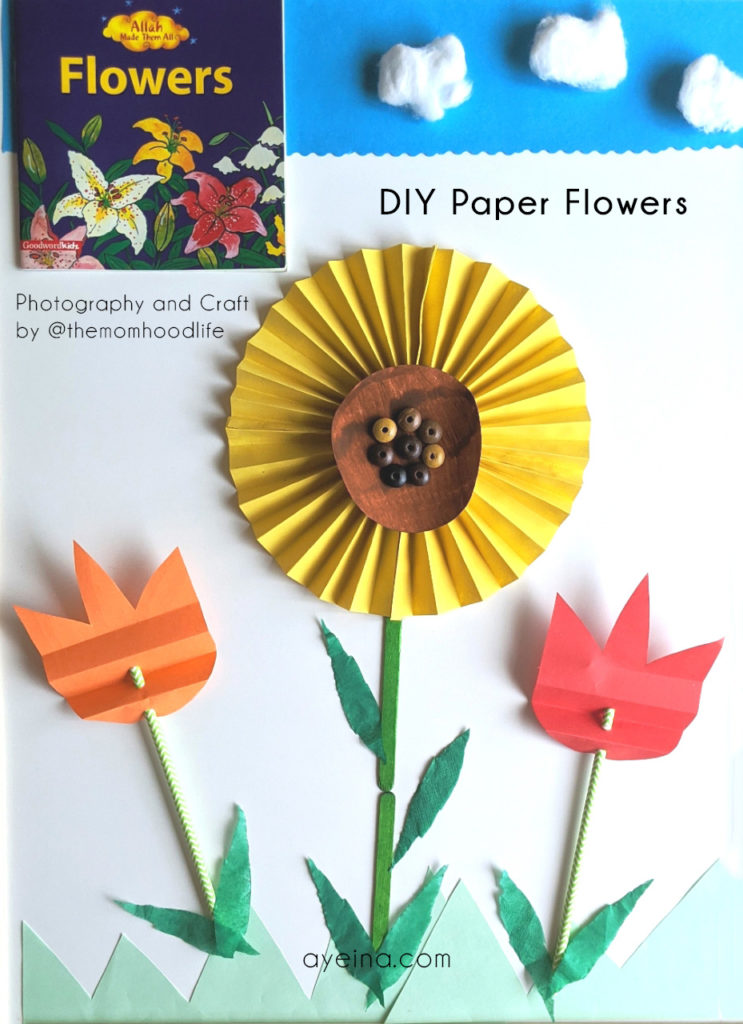
22) Allah Made them All (Educational Book)
Fatima from @themomhoodlife chose the book “Allah Made them All – Flowers” by Sadia Khan – “which is a beautifully illustrated book to remind little readers that Allah has created flowers and plants in many different colours, shapes and sizes – not just to add beauty to our lives, but also provides shade, shelter and homes for many animals and insects. They have an ability to heal us and provide us with food to eat! Each page describes a different characteristic of flowers, with an accompanying Dua to Allah.”
Materials needed for the DIY paper flowers: Colourful craft papers, Buttons, Glue, Straws, Ice cream sticks, Green tissue paper.
What to do: Make 2 yellow craft paper fans (accordion fold style). Fold each fan in half, and glue the edges together to form a semi circle shaped fan. Thereafter glue the two fans together to form a circle. Draw a circle, colour it in brown/ cut brown craft paper in a circle shape. Glue it to the centre of the flower. Stick buttons. Use two green ice cream sticks as the stem (Stick together with glue and attach to the flower). Cut out leaf-shaped tissue paper and stick to the stem with glue. Draw a Tulip freehand onto coloured craft paper. Fold the tulip as you would when making a fan. Punch/ Pierce holes through the flower. Thread through the straw. Stick tissue paper leaves to the straw.
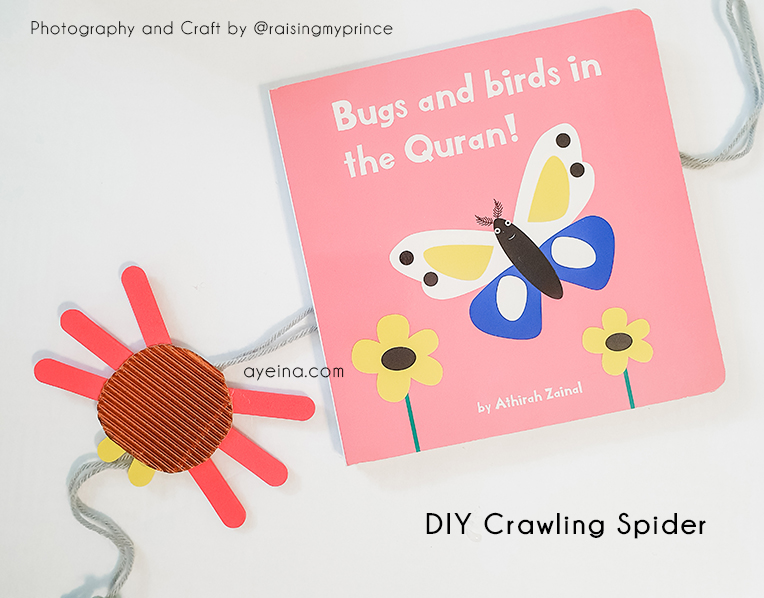
23) Bugs and Birds in the Quran (Board Book)
Ayesha from @raisingmyprince chose the book “Bugs and Birds in the Quran” by Athirah Zainal – “which is a board book with high contrast images (black, white and primary colours) of bugs and birds mentioned in the Quran. It presents the perfect stimulation for a growing baby’s eyes! The book has a variety of animals and the Quranic verses talking about them introducing little tots to these wonderful Creations of Allah.”
Materials needed for the DIY crawling spider: Short popsicle sticks, UHU Glue or Hot glue gun, Paint (optional), Drinking Straw, Yarn.
What to do: Cut a circle from any colored craft paper of choice. This will make your spider’s body. Cut 3 popsicle sticks in half and glue them 3 on each side in an angle from the back on the spider’s body. Cut 2 small pieces from the popsicle sticks to make the spider’s fangs and glue that to the bottom of the body at an angle. Cut 2 equal sized pieces (3 cm) from a drinking straw and glue that next to each other vertically to the back of the spider’s body. Cut a length of yarn a few feet long and thread an end through each piece of drinking straw and tie the two ends together in a knot to create one big loop. Now you can hang the spider thread over a door knob or hook. To make the spider climb hold a thread in each hand. Pull the threads to the side and it will force your spider up. Bring your hands back together and gravity will pull the spider back down again. You can see THIS VIDEO TUTORIAL for an in-depth look.
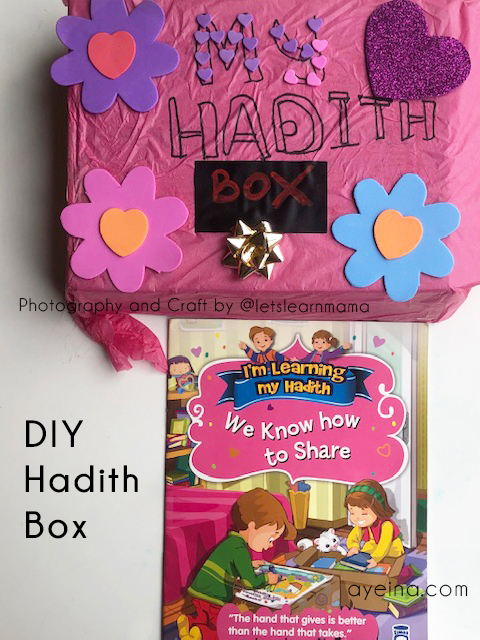
24) We Know How to Share (Story Book)
Eva from @letslearnmama chose the book “We Know How to Share” by Nur Kutlu – “which is one of then ten “I am learning my Hadith” books. The story is about two siblings (Zaynab and Tariq) who have a ” Hadith Box” in their house. Each week their mother and father write down a Hadith on a piece of paper and then they add it to the box. Each book in the series is about a certain Hadith picked from that box. All the members of the family try to obey it throughout the story. The books are great for children aged 5 and above and a brilliant start for them to memorise some of the Hadiths.”
Materials needed for the DIY Hadith Box: an empty cardboard shoe box, tissue paper, glue, gems, stickers and/or sequins, pens.
What to do: Use tissue paper to cover (glue) the entire shoe box. Let your child decorate it with stickers and sequins. They can either write with a felt pen “Hadith Box” or use alphabet stickers. Older children can write the ahadith on a piece of paper and put it inside the box.
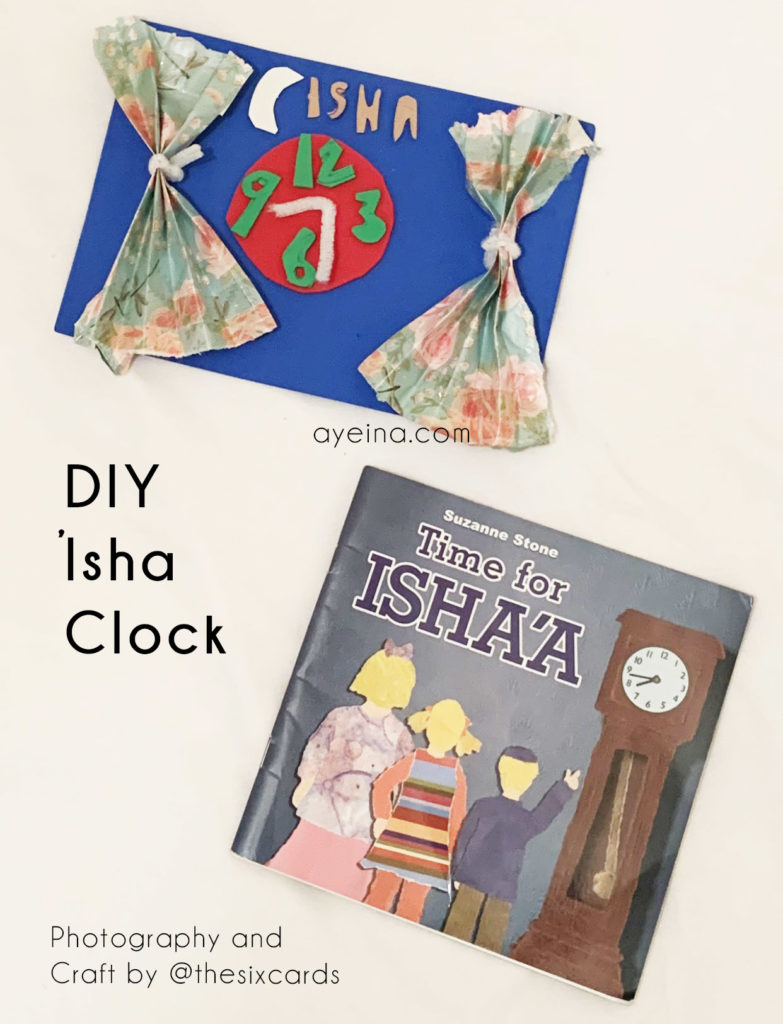
25) Time for Isha (Counting Picture Book)
Amina from @thesixcards chose the book “Time for ‘Isha” by Suzanne Stone – “which covers the last prayer – Salatul Isha in a rhyme form. It’s a beautiful book that not only illustrates the timing of the prayer (ie: being the last prayer done after it’s dark) but also has a counting theme that goes through what a person might encounter whilst walking to the masjid, the community, friends, scenery, and more. For this craft, we did a window showing the time and curtains, because Isha for us means it’s bed time so time to draw the curtains and prepare to pray and go bed.”
Materials needed for the DIY ‘Isha clock: Wrapping sheet, pipe cleaners, foam sheets, cardstock, glue.
What to do: Take a wrapping sheet to make the curtains and pipe cleaner to make the arms for the clock along with the curtain tie backs. With different color foam paper, make numbers, and the background. You will need a white paper to make the moon. Cut out the numbers and a circle shape to make the clock. To make the curtains, you will need to cut out a small piece and fold it as if you making a paper fan. Then open it slightly and tie it with pipe cleaners. Stick everything together with glue.
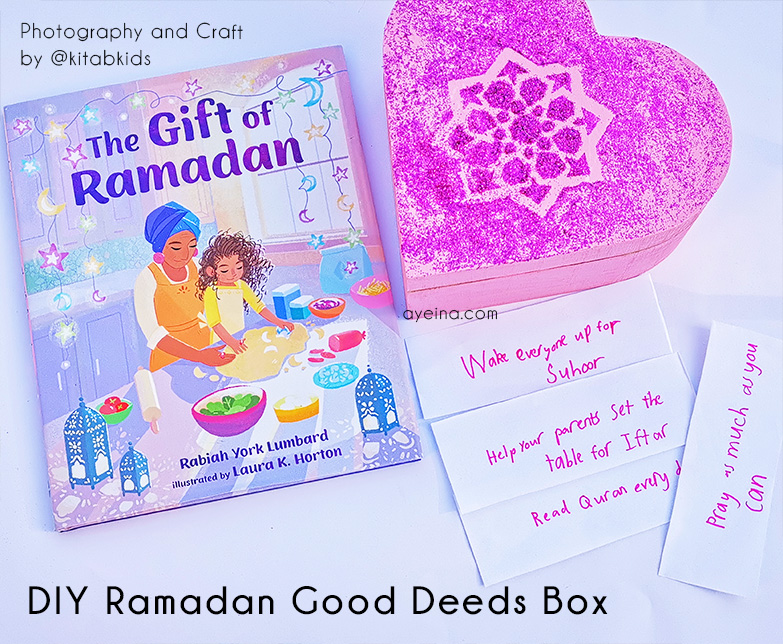
26) The Gift of Ramadan (Story Book)
Stephanie from @kitabkids chose the book “The Gift of Ramadan” by Rabiah York Lumbard – “which tells the story of Sophia, a little girl who desperately wants to gain a heart that is ‘shiny’ after her grandmother explains to her that fasting and doing good deeds during Ramadan polishes the heart and makes it sparkle. This concept of a heart so clean and pure that it sparkles, appealed to me greatly as a crafter and I knew that the children and I could create something beautiful and useful for Ramadan, taking this vivid image as our inspiration. We decided to make a heart shaped box to store all of the good deeds the children do throughout the blessed month, which will then be read at its conclusion. I found this wooden box in the craft section of a local chain store.”
Materials needed for the DIY Ramadan good deeds box: Heart shaped box, glitter, glue, pattern (stencil), pieces of paper to put in.
What to do: Chose our paint colour and gave the box a couple of coats. Applied a thin layer of clear drying PVA glue to the top of the box. Selected an ornament from our Ramadan ornament box and used it as a template, placing it down very gently on top of the layer of glue and being careful not to press down to avoid it adhering to the surface. Carefully sprinkled glitter over the top of the box and the glue, as thinly as possible. Left the glue and glitter to dry for a matter of minutes. Removed the ornament from the box by lifting it directly upwards (so as to avoid the excess glitter ruining the pattern). When the glue was completely dry we gently brushed off any excess. Created cards or little slips of paper for children to write down their good deeds and leave them beside the box. And there you have it! Our shiny Ramadan heart box inspired by the beautiful The Gift of Ramadan.
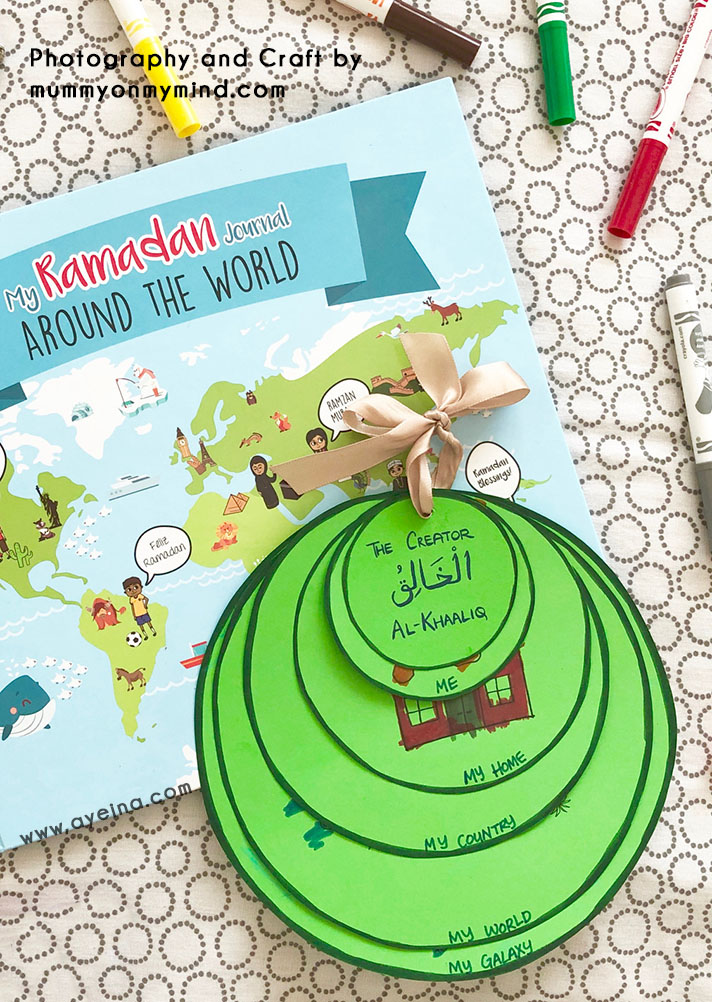
27) Ramadan Around the World (Journal)
mummyonmymind.com chose the book “My Ramadan Journal- Around the World”, which teaches about the different cultures that co-exist in this world and how there are different ways to celebrate the blessed month of Ramadan. As my four year old child begins to excitedly ask questions about our world, stars and planets, I thought this craft would be a great way to increase his awareness of space and his location in this huge world.
Materials needed for the geography craft: paper, ribbon, scissor, markers
What to do: Cut out different shaped circles on some coloured paper – each being bigger than the last and them up with a ribbon. Label each circle as: “Me, My Home, My Country, My World, My Galaxy.” You can add more variations to create a more detailed understanding such as town/city/continent etc. Draw representatives of each of the labels and asked the child to colour them in. Your child can draw on their own too if they are big enough.
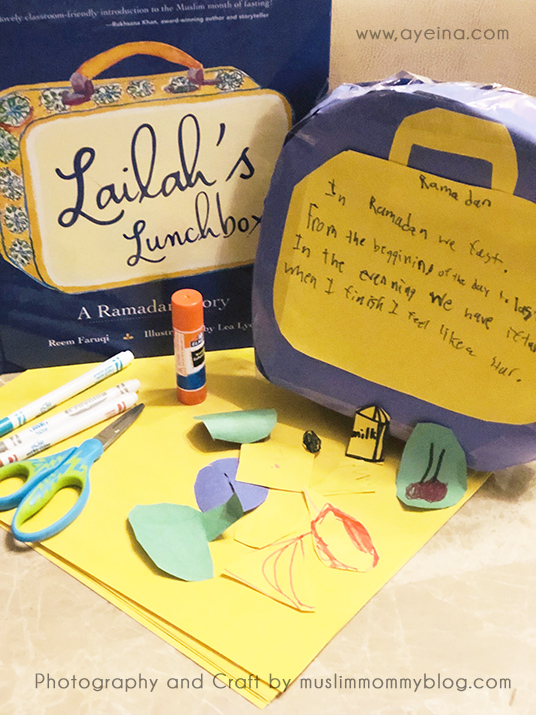
28) Laila’s Lunchbox (Story Book)
muslimmommyblog.com chose the book “Lailah’s Lunchbox” by Reem Faruqi, which is a story of a young girl who moves from Abu Dhabi to America in Ramadan. With a Ramadan poem within, the book explores the struggle of a school girl having a difficult time expressing why she left her lunchbox at home.
Materials needed for the lunchbox craft: Blue and yellow construction paper, scissor, glue stick, and markers.
What to do: Trace out the outline of a lunchbox on yellow paper. Have your child cut out the lunchbox with kid-friendly scissors. Glue the yellow lunchbox unto the blue construction paper. Get markers and have your child write and make up their own poem about Ramadan. Encourage them to express themselves!
29) Ilyas and Duck Fantastic Festival Eid al-Fitr (Story Book)
mumzynotebook.com chose the book “Ilyas & Duck – Fantastic Festival of Eid-ul-Fitr” by Omar S. Khawaja, which is a story of a boy and its pet who explore the fun and excitement of Eid and learn about the charitable nature of it all. she said: “The story encouraged my daughter’s curious mind to ask lots of questions about how to help the less fortunate and how to share, and that inspired us to create our craft- My Zakat Pot”.C
Materials needed for the zakat pot craft: decorating material (stickers, foam boards, pompoms etc.), paper, marker, cutter, scissor, glue or tape.
What to do: We washed an empty popcorn pot and started to decorate it with golden circular stickers (you may take any pot or jar available). Draw the outline of a mosque, cut it out and outline it with black marker. Write on it ‘My Zakat Pot’ and stick it on the lid. Using a sharp cutter, make a slot on the top of the lid, enough to let a coin through and outline the slit with a black marker.

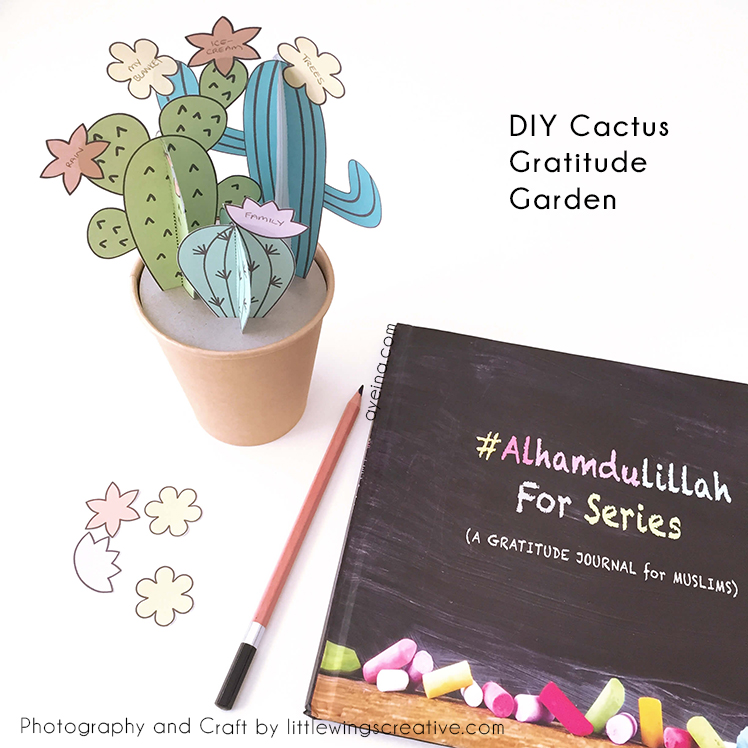
30) “Alhamdulillah For” Series (Gratitude Journal)
Cherie from Little Wings Creative chose our book “Alhamdulillah For Series” – which is a shukr journal for kids divided into 4 main categories – basic necessities (so kids can appreciate even the most mundane things in life – like breath, food, home etc.), relationships (to help kids see the beauty of family and human connections), Islam (to guide them towards reflection within and associate positivity with spirituality) and everything in between. Kids can fill it up in a month with just one Alhamdulillah a day so they can bring joy in their blessings with an attitude of gratitude. It’s amazing how a shift of mindset can actually change our whole lives.
Materials needed for the DIY Cactus Gratitude Garden: printer, colouring tools, thick paper, light cardstock paper, scissors, craft knife, paper cup, glue.
What to do: Print out the Cactus Gratitude Garden template on thick paper. Colour in the cactus and flowers if using the black and white version template. Cut out each cactus and the flowers. Remember to cut along the dotted line in the middle of each cactus shape to make a slot. Slot the 2 matching cactus shapes together to create a 3D cactus. Repeat for each cactus. Place the paper cup upside down on a separate piece of card and trace around the top to create a circle base. Cut out the circle base, making it slightly smaller so it will fit inside the paper cup. Work out the position for each cactus on the base, mark a cross using pencil, then cut the 3 crosses using the craft knife. These will be the slots for each of your cactus to sit in. Fill the paper cup up with scrunched up paper (you can use your paper scraps). This will be the pot. Insert each cactus into the slots on the base. Place the base on top of the scrunched paper in the paper cup pot. Find 1 thing to be grateful for each day. Write it down on a flower and glue the flower to the cactus. See how quickly your Cactus Gratitude Garden can grow flowers!
If you end up making any craft out of these, please do share it with us. We want to do this each year to support Muslim authors because as self-publishers ourselves, we know how hard it is to sustain a small business where most of your income goes back into the editing, illustration, production, marketing, warehousing, packaging and shipment etc. Although AYEINA uses its income for re-investment purposes only (for the sake of sadaqah jaariyah in shaa Allah), but many of these authors make a living out of these books too and are running their households (some as single mothers) with their small business. Tell me in the comments below which one is your favourite craft?
")
")
")
Wow, Masya Allah 😍😍😍👍👍👍❤❤❤ jazaakillah khair for the ideas, sista.
Barak ALLAHou fiki for this useful article. Great ideas !!!
jazakAllah khair. Credit goes to all the bloggers who contributed.
Masya Allah, its amazing idea.
jazakillah khair for the ideas
It is amazing ideas it is wonderful Jazakhallah Khair
Masha Allah very helpful